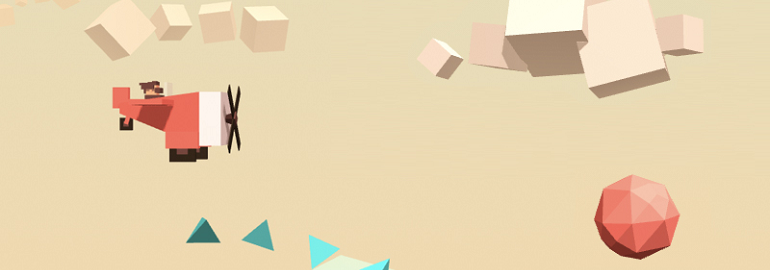
В этой серии из двух статей мы создадим простую 3D-игру про летающий самолётик при помощи Three.js, библиотеки, упрощающей работу с WebGL. WebGL — для многих тёмный лес из-за сложности и синтаксиса GLSL. Но благодаря Three.js реализация 3D в браузере стала гораздо проще.
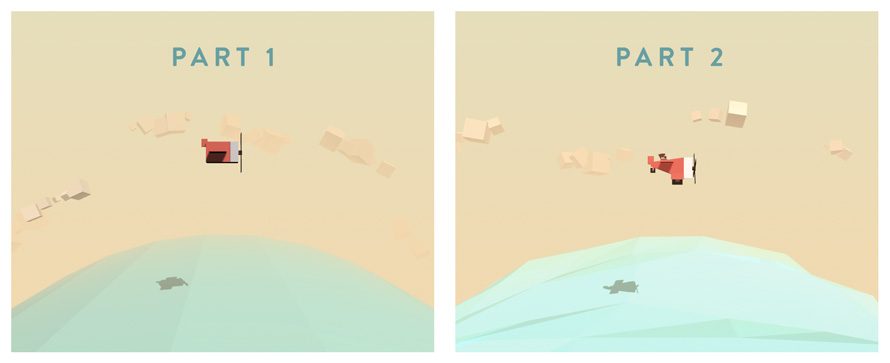
В первой части мы разберем основы Three.js и создадим сцену. Во второй — улучшим графику и добавим атмосферности. В данном руководстве не будет разбираться создание всей игры, но вы можете изучить её исходный код и сделать на его основе что-то своё.
Итак, начнём!
HTML и CSS
В этом руководстве упор будет сделан на библиотеку Three.js. Посетите сайт и GitHub-репозиторий, чтобы узнать про неё больше.
Сперва мы импортируем библиотеку в заголовке HTML :
Хотя JavaScript-код и бывает громоздким, его структура весьма проста. Все основные действия нужно поместить в функцию init:
			window.addEventListener('load', init, false);

function init() {
	// set up the scene, the camera and the renderer
	createScene();

	// add the lights
	createLights();

	// add the objects
	createPlane();
	createSea();
	createSky();

	// start a loop that will update the objects' positions
	// and render the scene on each frame
	loop();
}
Настройка сцены
Для создания проекта на Three.js нам нужен следующий минимальный набор:
Сцена: представьте её, как площадку, на которую нужно добавить каждый объект для отрисовки.
Камера: в нашем случае мы будем использовать перспективную камеру, но могли бы взять и ортогональную.
Рендерер: он отрисует всю сцену, используя WebGL.
Один или несколько объектов: в нашем случае — самолёт, море и небо (несколько облаков).
Один или несколько источников света: доступно несколько видов источников. Мы будем использовать полусферический источник для атмосферы и направленный — для теней.
Сцена, камера и отрисовщик создаются в функции createScene:
			var scene,
	camera, fieldOfView, aspectRatio, nearPlane, farPlane, HEIGHT, WIDTH,
	renderer, container;

function createScene() {
	// Get the width and the height of the screen,
	// use them to set up the aspect ratio of the camera
	// and the size of the renderer.
	HEIGHT = window.innerHeight;
	WIDTH = window.innerWidth;

	// Create the scene
	scene = new THREE.Scene();

	// Add a fog effect to the scene; same color as the
	// background color used in the style sheet
	scene.fog = new THREE.Fog(0xf7d9aa, 100, 950);

	// Create the camera
	aspectRatio = WIDTH / HEIGHT;
	fieldOfView = 60;
	nearPlane = 1;
	farPlane = 10000;
	camera = new THREE.PerspectiveCamera(
		fieldOfView,
		aspectRatio,
		nearPlane,
		farPlane
		);

	// Set the position of the camera
	camera.position.x = 0;
	camera.position.z = 200;
	camera.position.y = 100;

	// Create the renderer
	renderer = new THREE.WebGLRenderer({
		// Allow transparency to show the gradient background
		// we defined in the CSS
		alpha: true,

		// Activate the anti-aliasing; this is less performant,
		// but, as our project is low-poly based, it should be fine :)
		antialias: true
	});

	// Define the size of the renderer; in this case,
	// it will fill the entire screen
	renderer.setSize(WIDTH, HEIGHT);

	// Enable shadow rendering
	renderer.shadowMap.enabled = true;

	// Add the DOM element of the renderer to the
	// container we created in the HTML
	container = document.getElementById('world');
	container.appendChild(renderer.domElement);

	// Listen to the screen: if the user resizes it
	// we have to update the camera and the renderer size
	window.addEventListener('resize', handleWindowResize, false);
}
Поскольку размер экрана может изменяться, нам нужно обновлять размер отрисовщика и соотношение сторон камеры:
			function handleWindowResize() {
	// update height and width of the renderer and the camera
	HEIGHT = window.innerHeight;
	WIDTH = window.innerWidth;
	renderer.setSize(WIDTH, HEIGHT);
	camera.aspect = WIDTH / HEIGHT;
	camera.updateProjectionMatrix();
}
Источники света
Настройка освещения — это один из самых сложных этапов создания сцены. Источники света задают настроение всей сцены, поэтому работать с ними нужно очень внимательно. На данном этапе мы просто настроим освещение таки образом, чтобы видеть все объекты.
			var hemisphereLight, shadowLight;

function createLights() {
	// A hemisphere light is a gradient colored light;
	// the first parameter is the sky color, the second parameter is the ground color,
	// the third parameter is the intensity of the light
	hemisphereLight = new THREE.HemisphereLight(0xaaaaaa,0x000000, .9)

	// A directional light shines from a specific direction.
	// It acts like the sun, that means that all the rays produced are parallel.
	shadowLight = new THREE.DirectionalLight(0xffffff, .9);

	// Set the direction of the light
	shadowLight.position.set(150, 350, 350);

	// Allow shadow casting
	shadowLight.castShadow = true;

	// define the visible area of the projected shadow
	shadowLight.shadow.camera.left = -400;
	shadowLight.shadow.camera.right = 400;
	shadowLight.shadow.camera.top = 400;
	shadowLight.shadow.camera.bottom = -400;
	shadowLight.shadow.camera.near = 1;
	shadowLight.shadow.camera.far = 1000;

	// define the resolution of the shadow; the higher the better,
	// but also the more expensive and less performant
	shadowLight.shadow.mapSize.width = 2048;
	shadowLight.shadow.mapSize.height = 2048;

	// to activate the lights, just add them to the scene
	scene.add(hemisphereLight);
	scene.add(shadowLight);
}
Видно, что для настройки освещения используется много параметров. Не бойтесь экспериментировать с цветами, их интенсивностью и источниками света: вы обнаружите огромное количество интересных сочетаний и разберётесь, как их настраивать в соответствии с вашими нуждами.
Создание объекта в Three.js
Если вы разбираетесь в создании 3D-моделей, то можете импортировать в проект свои модели. Мы же создадим объекты из примитивов Three.js, чтобы понять, как они устроены.
В Three.js доступны следующие примитивы: куб, сфера, тор, цилиндр и плоскость. В нашем проекте все объекты будут являться комбинациями этих тел.
Простой цилиндр для моря
Начнём с создания моря, поскольку это самая простая часть. Не будем усложнять и зададим море простым голубым цилиндром, помещённым внизу экрана. В дальнейшем мы сделаем его более красивым.
Теперь давайте сделаем море чуть более привлекательным, а волны — более реалистичными:
			// First let's define a Sea object :
Sea = function(){

	// create the geometry (shape) of the cylinder;
	// the parameters are:
	// radius top, radius bottom, height, number of segments on the radius, number of segments vertically
	var geom = new THREE.CylinderGeometry(600,600,800,40,10);

	// rotate the geometry on the x axis
	geom.applyMatrix(new THREE.Matrix4().makeRotationX(-Math.PI/2));

	// create the material
	var mat = new THREE.MeshPhongMaterial({
		color:Colors.blue,
		transparent:true,
		opacity:.6,
		shading:THREE.FlatShading,
	});

	// To create an object in Three.js, we have to create a mesh
	// which is a combination of a geometry and some material
	this.mesh = new THREE.Mesh(geom, mat);

	// Allow the sea to receive shadows
	this.mesh.receiveShadow = true;
}

// Instantiate the sea and add it to the scene:

var sea;

function createSea(){
	sea = new Sea();

	// push it a little bit at the bottom of the scene
	sea.mesh.position.y = -600;

	// add the mesh of the sea to the scene
	scene.add(sea.mesh);
}
Итак, давайте подытожим, что нужно для создания объекта. Нам нужно:
создать геометрическую модель;
создать материал;
передать их в меш;
добавить меш на сцену.
Следуя этим простым шагам, мы можем создать множество разных примитивных объектов и объединить их в более сложные фигуры.
В следующих этапах мы займёмся именно этим.
Объединяем простые кубы для создания сложной фигуры
Облака уже чуть сложнее моря, поскольку они состоят из нескольких соединённых случайным образом кубов.
			Cloud = function(){
	// Create an empty container that will hold the different parts of the cloud
	this.mesh = new THREE.Object3D();

	// create a cube geometry;
	// this shape will be duplicated to create the cloud
	var geom = new THREE.BoxGeometry(20,20,20);

	// create a material; a simple white material will do the trick
	var mat = new THREE.MeshPhongMaterial({
		color:Colors.white,
	});

	// duplicate the geometry a random number of times
	var nBlocs = 3+Math.floor(Math.random()*3);
	for (var i=0; i<nBlocs; i++ ){

		// create the mesh by cloning the geometry
		var m = new THREE.Mesh(geom, mat);

		// set the position and the rotation of each cube randomly
		m.position.x = i*15;
		m.position.y = Math.random()*10;
		m.position.z = Math.random()*10;
		m.rotation.z = Math.random()*Math.PI*2;
		m.rotation.y = Math.random()*Math.PI*2;

		// set the size of the cube randomly
		var s = .1 + Math.random()*.9;
		m.scale.set(s,s,s);

		// allow each cube to cast and to receive shadows
		m.castShadow = true;
		m.receiveShadow = true;

		// add the cube to the container we first created
		this.mesh.add(m);
	}
}
Теперь, когда мы создали облако, мы заполним им всё небо, разместив его копии случайным образом на оси z:
			// Define a Sky Object
Sky = function(){
	// Create an empty container
	this.mesh = new THREE.Object3D();

	// choose a number of clouds to be scattered in the sky
	this.nClouds = 20;

	// To distribute the clouds consistently,
	// we need to place them according to a uniform angle
	var stepAngle = Math.PI*2 / this.nClouds;

	// create the clouds
	for(var i=0; i<this.nClouds; i++){
		var c = new Cloud();

		// set the rotation and the position of each cloud;
		// for that we use a bit of trigonometry
		var a = stepAngle*i; // this is the final angle of the cloud
		var h = 750 + Math.random()*200; // this is the distance between the center of the axis and the cloud itself

		// Trigonometry!!! I hope you remember what you've learned in Math :)
		// in case you don't:
		// we are simply converting polar coordinates (angle, distance) into Cartesian coordinates (x, y)
		c.mesh.position.y = Math.sin(a)*h;
		c.mesh.position.x = Math.cos(a)*h;

		// rotate the cloud according to its position
		c.mesh.rotation.z = a + Math.PI/2;

		// for a better result, we position the clouds
		// at random depths inside of the scene
		c.mesh.position.z = -400-Math.random()*400;

		// we also set a random scale for each cloud
		var s = 1+Math.random()*2;
		c.mesh.scale.set(s,s,s);

		// do not forget to add the mesh of each cloud in the scene
		this.mesh.add(c.mesh);
	}
}

// Now we instantiate the sky and push its center a bit
// towards the bottom of the screen

var sky;

function createSky(){
	sky = new Sky();
	sky.mesh.position.y = -600;
	scene.add(sky.mesh);
}
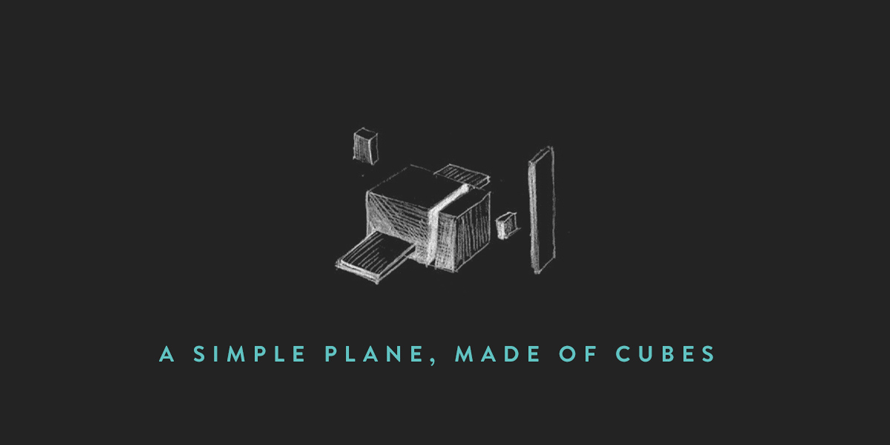
Ещё сложнее: создаём самолёт
Плохая новость: код самолёта будет длиннее и сложнее. Хорошая: мы знаем уже почти всё необходимое! Весь процесс заключается в комбинировании и инкапсуляции фигур.
			var AirPlane = function() {

	this.mesh = new THREE.Object3D();

	// Create the cabin
	var geomCockpit = new THREE.BoxGeometry(60,50,50,1,1,1);
	var matCockpit = new THREE.MeshPhongMaterial({color:Colors.red, shading:THREE.FlatShading});
	var cockpit = new THREE.Mesh(geomCockpit, matCockpit);
	cockpit.castShadow = true;
	cockpit.receiveShadow = true;
	this.mesh.add(cockpit);

	// Create the engine
	var geomEngine = new THREE.BoxGeometry(20,50,50,1,1,1);
	var matEngine = new THREE.MeshPhongMaterial({color:Colors.white, shading:THREE.FlatShading});
	var engine = new THREE.Mesh(geomEngine, matEngine);
	engine.position.x = 40;
	engine.castShadow = true;
	engine.receiveShadow = true;
	this.mesh.add(engine);

	// Create the tail
	var geomTailPlane = new THREE.BoxGeometry(15,20,5,1,1,1);
	var matTailPlane = new THREE.MeshPhongMaterial({color:Colors.red, shading:THREE.FlatShading});
	var tailPlane = new THREE.Mesh(geomTailPlane, matTailPlane);
	tailPlane.position.set(-35,25,0);
	tailPlane.castShadow = true;
	tailPlane.receiveShadow = true;
	this.mesh.add(tailPlane);

	// Create the wing
	var geomSideWing = new THREE.BoxGeometry(40,8,150,1,1,1);
	var matSideWing = new THREE.MeshPhongMaterial({color:Colors.red, shading:THREE.FlatShading});
	var sideWing = new THREE.Mesh(geomSideWing, matSideWing);
	sideWing.castShadow = true;
	sideWing.receiveShadow = true;
	this.mesh.add(sideWing);

	// propeller
	var geomPropeller = new THREE.BoxGeometry(20,10,10,1,1,1);
	var matPropeller = new THREE.MeshPhongMaterial({color:Colors.brown, shading:THREE.FlatShading});
	this.propeller = new THREE.Mesh(geomPropeller, matPropeller);
	this.propeller.castShadow = true;
	this.propeller.receiveShadow = true;

	// blades
	var geomBlade = new THREE.BoxGeometry(1,100,20,1,1,1);
	var matBlade = new THREE.MeshPhongMaterial({color:Colors.brownDark, shading:THREE.FlatShading});

	var blade = new THREE.Mesh(geomBlade, matBlade);
	blade.position.set(8,0,0);
	blade.castShadow = true;
	blade.receiveShadow = true;
	this.propeller.add(blade);
	this.propeller.position.set(50,0,0);
	this.mesh.add(this.propeller);
};
Самолёт выглядит слишком просто, не так ли? Не волнуйтесь, в дальнейшем мы сделаем его куда более привлекательным!
Разместим самолёт на сцене:
			var airplane;

function createPlane(){
	airplane = new AirPlane();
	airplane.mesh.scale.set(.25,.25,.25);
	airplane.mesh.position.y = 100;
	scene.add(airplane.mesh);
}
Отрисовка
Мы создали несколько объектов и разместили их на сцене. Но если вы запустите игру, то ничего не увидите! А всё потому, что мы забыли отрисовать сцену. Делается это очень просто:
renderer.render(scene, camera);
Анимация
Давайте оживим нашу сцену, настроив вращение пропеллера самолёта, моря и облаков.
Для этого нам понадобится бесконечный цикл:
			function loop(){
	// Rotate the propeller, the sea and the sky
	airplane.propeller.rotation.x += 0.3;
	sea.mesh.rotation.z += .005;
	sky.mesh.rotation.z += .01;

	// render the scene
	renderer.render(scene, camera);

	// call the loop function again
	requestAnimationFrame(loop);
}
Мы можете заметить, что вызов отрисовщика перенесён в цикл. Мы сделали это потому, что каждое изменение объекта нужно отрисовывать заново.
Следуй за мышью: настройка взаимодействия
Сейчас наш самолёт помещён в центре сцены. Мы же хотим, чтобы он следовал за мышью.
После загрузки документа нам нужно добавить слушатель движений мыши. Для этого мы изменим функцию init следующим образом:
			function init(event){
	createScene();
	createLights();
	createPlane();
	createSea();
	createSky();

	//add the listener
	document.addEventListener('mousemove', handleMouseMove, false);

	loop();
}
Кроме того, мы создадим новую функцию для обработки движений мыши:
			var mousePos = {x:0, y:0};

// now handle the mousemove event

function handleMouseMove(event) {

	// here we are converting the mouse position value received
	// to a normalized value varying between -1 and 1;
	// this is the formula for the horizontal axis:

	var tx = -1 + (event.clientX / WIDTH)*2;

	// for the vertical axis, we need to inverse the formula
	// because the 2D y-axis goes the opposite direction of the 3D y-axis

	var ty = 1 - (event.clientY / HEIGHT)*2;
	mousePos = {x:tx, y:ty};

}
Нормализовав положение мыши, мы можем корректно перемещать самолёт.
Снова изменим цикл, добавив в него функцию для обновления положения самолёта:
			function loop(){
	sea.mesh.rotation.z += .005;
	sky.mesh.rotation.z += .01;

	// update the plane on each frame
	updatePlane();

	renderer.render(scene, camera);
	requestAnimationFrame(loop);
}

function updatePlane(){

	// let's move the airplane between -100 and 100 on the horizontal axis,
	// and between 25 and 175 on the vertical axis,
	// depending on the mouse position which ranges between -1 and 1 on both axes;
	// to achieve that we use a normalize function (see below)

	var targetX = normalize(mousePos.x, -1, 1, -100, 100);
	var targetY = normalize(mousePos.y, -1, 1, 25, 175);

	// update the airplane's position
	airplane.mesh.position.y = targetY;
	airplane.mesh.position.x = targetX;
	airplane.propeller.rotation.x += 0.3;
}

function normalize(v,vmin,vmax,tmin, tmax){

	var nv = Math.max(Math.min(v,vmax), vmin);
	var dv = vmax-vmin;
	var pc = (nv-vmin)/dv;
	var dt = tmax-tmin;
	var tv = tmin + (pc*dt);
	return tv;

}
Поздравляю, теперь вы можете управлять самолётом мышью! Вот что у нас получилось: демонстрация, часть 1.
Microsoft запустил бесплатный практический курс по протоколу Model Context Protocol (MCP) с примерами на Python, C#, Java и TypeScript для разработки LLM-приложений и серверов MCP.
Разбираем типичные проблемы при разработке компонентов. Изучаем, какие архитектурные подходы вложены в паттерн. Реализуем паттерн на примере компонента Аккордеон и смотрим на плюсы и минусы подходов
Ускорьте свой сайт с помощью чек-листа по оптимизации фронтенда: от HTML и CSS до изображений и серверов. Практические советы для повышения скорости, SEO и конверсий в 2025 году.